Digital Photo Frame Email
PhotoSpring allows a variety of methods to send photos and videos to the Frame. The easiest method is to send photos and videos as attachments in an email to the frame. This guide will take you through how to set up a unique email for your frame.
Benefits and Drawbacks of Sending Photos Via Email
Pros
- Assigning an email address to your frame takes at most 2-3 minutes. That's much faster than the 5-10 minutes it takes for any other method.
- Unlike other methods of sending photos to the frame, sending an email to the frame doesn't require a PhotoSpring account.
Cons
- There is a limit to the size of email attachments you can send. This makes email cumbersome for sending more than 15-20 photos at a time.
- PhotoSpring can accept emails up to 20mb in size
- Your email provider may limit you to less. Click here for a list of email providers and their limits.
- Anyone with the frame's email address can send photos to the frame
Setting Up Frame Email
Configuring the Frame Email if your frame has already been setup
If you are setting the frame up for the first time, then skip to the next section with the red heading: Configuring Frame Email
Otherwise, you will need to first navigate to the Manage Frame Email screen before going on to the next section.
|
You can get to the Manage Frame Email screen through the Menu Button. The Menu Button is a square with three lines located at the upper right corner of the screen. If you are in the Slideshow, tap the photo you see and it will shrink to reveal the Menu Button. |
 |
Once you are on the Manage Frame Email screen you can continue below.
Configuring Frame Email
Step 1: Enable Frame Email
To enable email you will have to ensure that the switch near the top of the screen is switch to the On position.
Here's what it looks like in the Off position:
 |
Tap or flick the switch to the right to turn it on. It will look something like this:
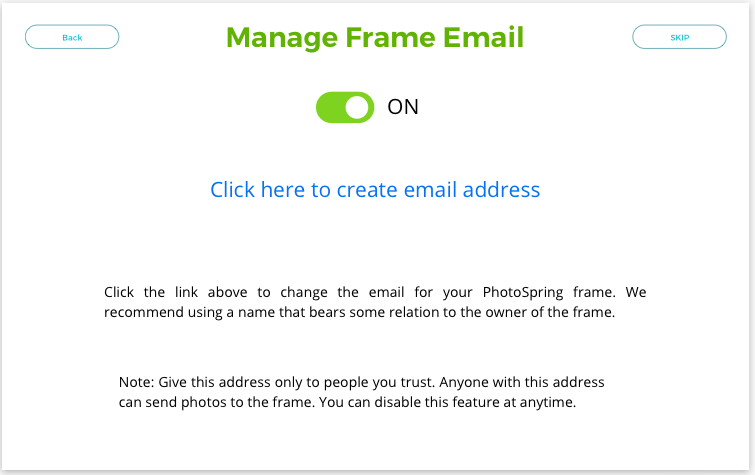
Note: if the switch is in the off position, no emails can be sent to the frame - even if you have already assigned the frame a name. Emails sent will bounce.
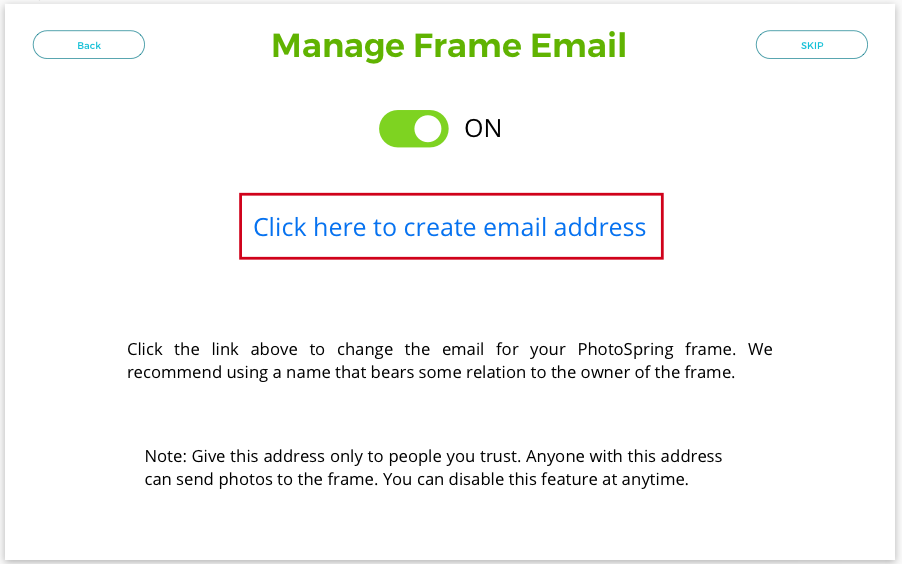
Step 2: Create Your Custom Frame Email
You now have the opportunity to enter a custom custom email. This will be the frame's email address. Any photos or videos you send as an attachment to this email will be processed and sent to the frame.
Start by tapping the link "Click here to create email address" as highlighted below:
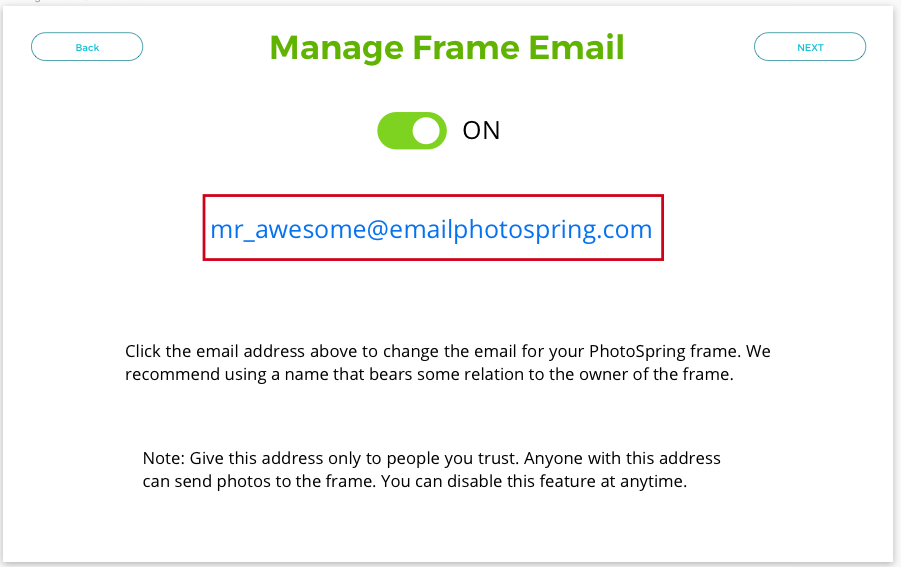
If you already have an email assigned to the frame, then tap on the email address to change it as in the example below:
Enter an email address you would like to assign to the frame in the popup that appears. A good email address is one you can easily remember and is a good identifier for you.
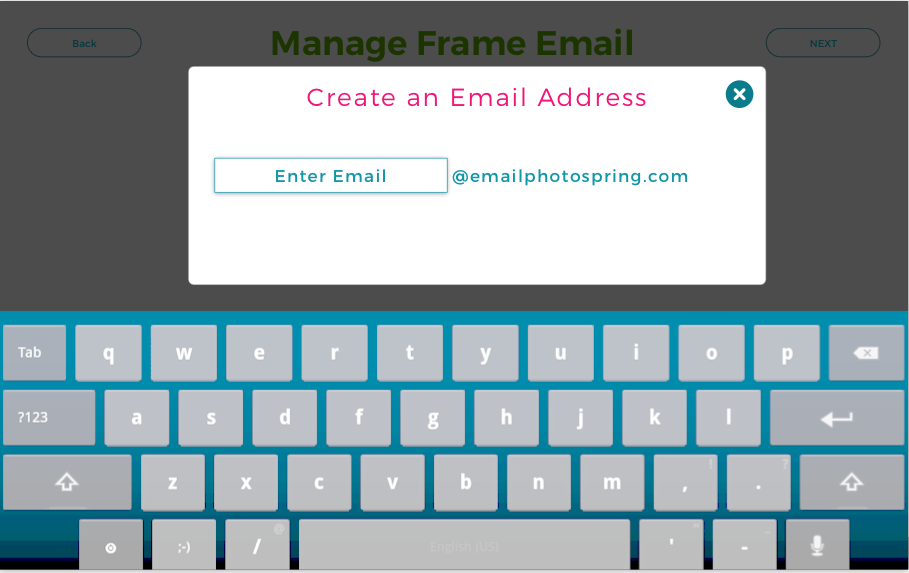
The latter part of the email will always be @emailphotospring.com
So if the prefix you entered was mr_awesome, then your frame's email address is:
mr_awesome@emailphotospring.com
When finished tap Submit.
If the email address is already taken or has bad formatting, then the error will be displayed on the screen. Otherwise you will be taken to the previous screen but with the email you entered now present. Tap Next to continue.
Step 3: Test the Email You Created
We highly recommend testing out the email address. To do this send an email with photos attached to the email address you just created.
 |
If you are successful in sending an email with a photo or video attached, then this screen will automatically progress to show you your photos. If you aren't successful, the email will bounce with an error message.
If you don't want to test the email you can tap the SKIP button to continue. This will take you to setup for a PhotoSpring account.
Restrictions on Sending Photos to the Frame Via Email
Restrictions
Keep in mind:
- PhotoSpring will only receive emails that are 25mb or less in total size. So the total size of your attachments needs to be less than 25MB.
- You email provider may limit the size of emails you send to much less than 25MB.
- Links to photos will not be processed. For Macs, this means Mail Drop will not work.
Sending photos should take about 30 seconds for the first photo to start appearing. Videos will take longer to process. The longer the video, the longer you will need to wait.
Sending to an Album
You can specify what album you would like to send photos or videos to by adding in the first line of the email:
album="my album"
where my album is the name of the album where you want the photos or videos to go.
Sending to Multiple Recipients
You can email photos and videos to multiple PhotoSpring frames at the same time.
Note: it is NOT recommended to email your frame and friends at the same time. If friends reply to your email with photos you don't want, then those photos will appear on your frame.
Bounced Emails
PhotoSpring will bounce your email if:
- The attachments are too big
- There are no attachments
- The recipient is not recognized as an email in our system
Successfully sent emails may get a reply, but not always.
If an email is successfully sent, the photos attached will be in the cloud waiting for the frame to pick them up. If you don't see the photos or videos appear, please check that your frame is on and connected to the Internet.
Tags: Email Photos, Email Videos